Showing posts with label Tutorial Blender. Show all posts
Showing posts with label Tutorial Blender. Show all posts
Saturday, July 5, 2014

Sunday, June 15, 2014

Hellow Readers
Okay guy's, in this time, I'll try to Explain about How to make simple model in blender, Actually I make this tutorial for my junior in multimedia division of Cybertect Community, but if this tutorial useful and helpful for the other, Why not ? okay let's start the tutorial.
before we start the tutorial, i just want to say that I'm not Expert in blender and my English is bad and everyone have difference way to make a model, but in this time let's make a model on my way
I'll make low poly Spongebobsquare pants model with Blender 2.70 , just start the tutorial
First of all prepare all the thing you need
- blueprint models or Image reference
- coffe ( Why ?, because it will take more than 1 hours, may be for beginer like me)
- Passion (Why ?, dont ask it to me, you'll understand it by yourself
Spongebob Image reference
| .jpg) |
about the tools
- I'm using famous tools like what i had explained in my last posting, just Check it Importan Shortcut in Blender
- and maybe i will add another tools
okay, Open Blender and add Cube or use basic Cube in Blender, we start make spongebob body

Scale X Axis until like in image reference
 |
| scane X axis |
but, before we start, split the cube into 2 part ( Press A for select all and press w to give subdivide ), delete one side and give Miror modifier like in this image
|
|


if the relection doesn't comeout just setting in the modifier menu
 |
| Setting Mirror Modifier |
and then Drag the edge { Press Hold Alt and right click to select around the edge} in order to get square face for hand
 |
| move edge |
Now we will make it hand
change Mesh select mode to face, and select face same like in the image
 |
| selection tha face |
then press E for Extrude > Scale a bit > E > Drag like this image and slip again into 2 part like in the image
|
|


 |
| Make a hand |
add edge with knife (K) like in the image /*for finger
 |
| Make a finger |
Extrude face till looks like fingger

then Duplicate finger


add 5 finger
 |
| final finger |
Ok, finish making finger and hand, continue making leg
split cube like we do to hand for leg

Extrude face like we do before like this image

Extrude Face
 |
| Sample image for foot |
Ok, making leg finish, lets move making
Cloths
make limit betwen body and cloth like in Image reference
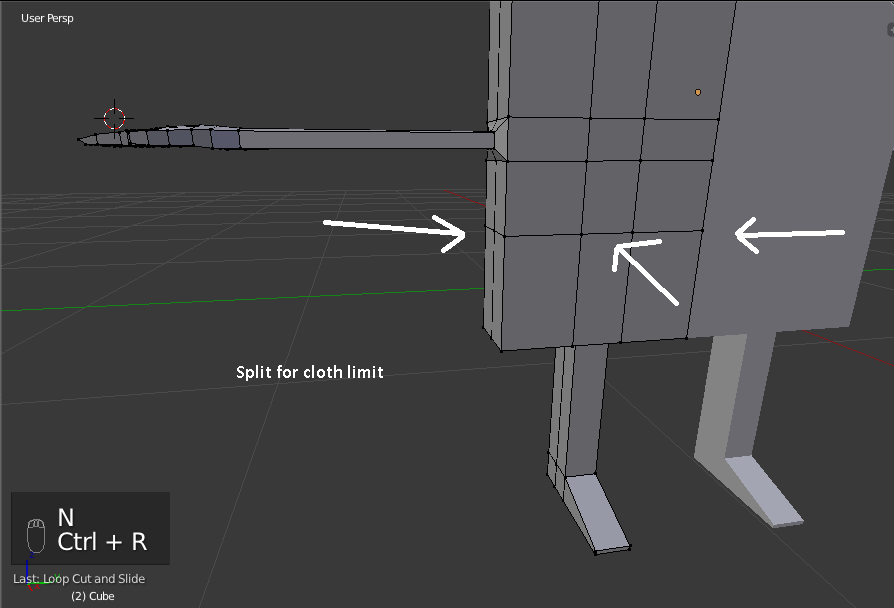
 |
| Sample image make cloth |
for the red tie, just draw it with Knife tool
 |
| Sample make a tie |
then selection face tie what you draw, then Extrude

we continue to make the pants


and Finish, now we'll make
The Arm
Selection face around hand, Extrude then Scale and the Extrude again and Bring to hand look the example image
 |
| Sample image Extrude for |
Setting the face and add edge then make looks like this image
 |
| Sample image arm |
the last thing we have to do is make it
Spongebob face
selection fron face for spongebob face and then Subdivide with 2 number of cut
 |
| Sample image Subdivide face for face |
move the edge till make circle like this picture
 |
| set vertex for eyelid |
Extrude face > Extrude > scale > Extrude > Scale till looks like in the piceture, then Drag go back
 |
| Sample image for eyelid |
add UV sphere for the eyes, and dont forget to uncheck Cliping at Mirror Modifier
 |
| Sample image add UV sphere |
set vertex around the eye to get best result
 |
| Simple for eye |
now we'll make mouth and tooth
add new edge by loopcut or you can draw with knife tool
 |
| Sample image add another edge |
 |
| Sample Image lips |
 |
| Sample image move vertex for lips |
 |
| Sample Image add Plane |
 |
| Sample Image plane |
 |
| Sample Image Extrude tooth |
 |
| Sample final tooth |
now, let's make the nose
first, select face where do you to add a nose, then give subdivide
 |
| Sample image subdivide face for nose |
 |
| Sample image Extrude for the nose |
 |
| Final vision |
I think enough for this tutorial "How to Make Simple Model in Blender" but this model isn't complete, now it's your job to complete it and, if you dont understand what i'm talkin' about or about my tutorial, please tell me.or you can ask it in our fans page Tulis Apa
And I'll try to make Video tutorial about Blender, but that is not easy <!-- for me --> Just wait and stay update in my youtube channel Hendrakid
and for my Junior " Dont stop to learning, and pratice and pratice again, just learning it by doing " you got what i mean
Cya ~
Thursday, June 12, 2014

Okay guy's, Today I'll give some explaination about Important Shortcuts Making Model in Blender, lets
there are several key U have to know and memorize, because that is a famous in Blender when we make a Model That is,
The function of Extrude is to gives the thickness of the object or add more face, Edge, Vertex n the Object. How do it ? it's very simple, just select your face or edge or vertex and then press E, drag where do you want
sample image :
Duplicate is make a copy from object, like Ctrl+C (copy) but is not same with it, Why ? because Duplicate is just Duplicated Vertex (Duplicate is only can in Edit Mode) not make new Object like Copy do (Copy is only ca in Object mode)
sample image :
there are several key U have to know and memorize, because that is a famous in Blender when we make a Model That is,
- E for Extrude
The function of Extrude is to gives the thickness of the object or add more face, Edge, Vertex n the Object. How do it ? it's very simple, just select your face or edge or vertex and then press E, drag where do you want
sample image :
|
| Extrude image |
- Shift + D for Duplicate
Duplicate is make a copy from object, like Ctrl+C (copy) but is not same with it, Why ? because Duplicate is just Duplicated Vertex (Duplicate is only can in Edit Mode) not make new Object like Copy do (Copy is only ca in Object mode)
sample image :
 |
| Copy ( Ctrl + C ) |
 |
| Duplicate ( Shift + D ) |
- Ctrl + R for Loop Cut
This tool is used for make new edge between 2 edge, or Slip face around into 2 part, I can't explain it in English language. To use Loop Cut just press Ctrl + R, bring your crusor to the front of your object and you'll see pink line, just move your crusor where U want and then left click or you can add more edge for Split the face around into somepieces
just look for the sample image :
 |
| loopcut image |
- Subdevide
Subdivide it's like loopcut but it doesn't same, Subdivide split face into 4 pieces and subdivide just for face which had been selected before, How to use it ? Select your face and then press W select Subdivide, and Taraa Sample image :
 |
| Subdivide image |
- K for Knife
Knife for make edge in face. Just click at first edge then click to the second edge

for Move, Scale, and Rotate Sortcut let me explain something to U
- About X,Y,Z Axis
Axis is a direction to move, it's mean that if we move the Object to X axis object will move to Right or Left,
if we move the Object to Y axis object will move to front or backside, and if we move the Object to Z axis object will move to Top or Buttom, ok let's it
- G for Grab/Move
G is for move the Object to X,Y,Z Axis
 |
- R for Rotation
R is for rotation the Object in X,Y,Z Axis
 |
- S for Scale
S is for scale the Object in X,Y,Z Axis
 |
- H for Hide
- Alt + H for Unhide
- C for select object (just try it)
- B for select object (just try it)
- Z for tansparan looks
- A for Select All or Unselect All
Okay, I think enough for today, I'm Sory for my bad English and if u get mistake, wrong or U dont know about this posting, just comment down here and dont forget to visit my Youtube Channel Hendrakid
for Indo "Kalau ada yang tidak dimengerti, Silahkan tanya jawab di FP Tulis Apa ?"
Thank you

![Quick Code - Change Source Image From Script [Tutorial][C#]](https://lh3.googleusercontent.com/blogger_img_proxy/AEn0k_sYS90w1mLf8LVvBkHOd6QxGTQuFiCIzMB7EnafE_E81abgwtm0XYIWJl8D5IxvJjmbGnVgc-v2DVbvvlUhFM-rc9iK8_-E4AonpA-Wol-wUm0)
![Quick Code - Sprite 2d As Button With Raycast2d [Unity][C#]](https://lh3.googleusercontent.com/blogger_img_proxy/AEn0k_sIx4JW9bJ8CjqZjrNStoD3EeyYDhgsoLWp2xcZTFMZgi54LvtnhhzsEVBKncjGZIGRPUCtOw-2K6d3KntEmqQ1nM89y1kHHLz9DTH9ka5S9uM)